Documentation

Executing Token Swap on Uniswap V3 with Pimlico's ERC20 Paymaster & Alto Bundler

Pimlico Plugin tailored for Account Abstraction (AA) with a performant ERC-4337 bundler and Pimlico Paymasters.

Introduction

This tutorial guides you through integrating Pimlico Paymaster with their ERC-4337 compatible Alto bundler for account abstraction in blockchain applications using the Pimlico plugin. Pimlico Alto simplifies bundling user operations into transactions and submitting them to the blockchain via standard JSON-RPC requests. It supports permissionless.js, enabling seamless Web3 application development and testing. Additionally it also supports Paymaster services allowing the users to perform gasless transactions, and paying for gas in ERC20s instead


Why Test Pimlico AA with BuildBear Sandbox?

✅ Seamless Integration

Pimlico Plugin is designed for effortless integration with BuildBear Sandboxes, making it easy to experiment with Account Abstraction (AA) features.

✅ Permissionless.js Support

  • High-level API for managing ERC-4337 smart accounts, bundlers, and paymasters.
  • Built on Viem for modularity and extensibility.

✅ JSON-RPC Support for Bundler

Interact with the bundler using standard methods:

  • eth_sendUserOperation
  • eth_estimateUserOperationGas
  • eth_getUserOperationReceipt
  • eth_getUserOperationByHash
  • eth_supportedEntryPoints
  • pimlico_getUserOperationGasPrice
  • pimlico_getUserOperationStatus

✅ ERC20 Paymaster Support

Choose from a list of supported tokens to pay for transactions in ERC20 instead of native tokens.

Supported ERC20s

✅ Unlocked Faucets

BuildBear provides unlimited access to native and ERC-20 tokens, ensuring smooth development and testing.


Step 1: Setting Up Pimlico

1. Create a BuildBear Sandbox

  • Navigate to BuildBear and create a new Sandbox or use an existing one.
  • Open the Plugins tab in your Sandbox dashboard.

2. Install the Pimlico Plugin

  • Locate Pimlico in the plugin marketplace.
  • Click Install to add it to your environment. Install Pimlico Plugin
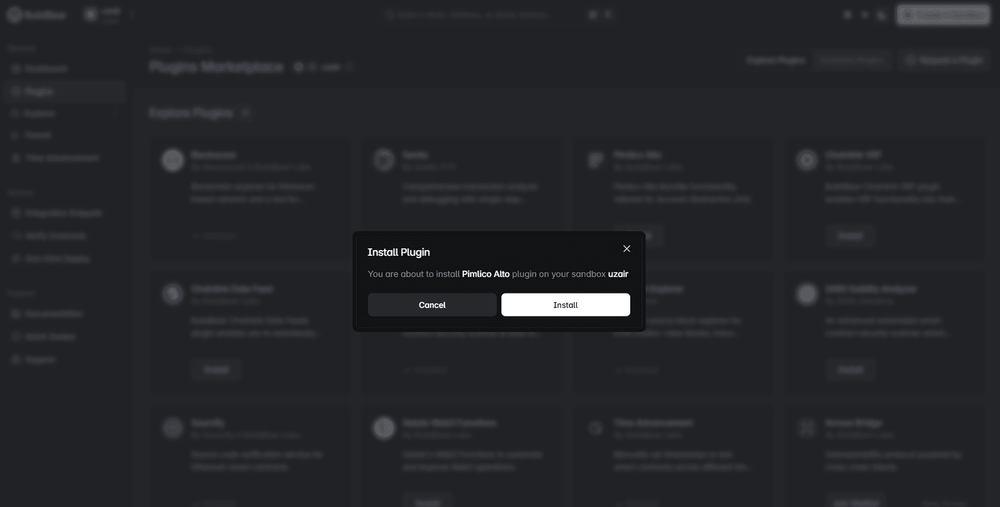
  • Verify installation in the Installed Plugins tab.

3. Retrieve the RPC URL

  • Open your BuildBear Sandbox dashboard.
  • Copy the RPC URL, which also serves as the Pimlico Client API endpoint.
BuildBear Sandbox RPC URL: https://rpc.buildbear.io/{Sandbox-ID}
Pimlico Client API: https://rpc.buildbear.io/{Sandbox-ID}

4. Install Dependencies

Ensure all necessary dependencies are installed. Example package.json:

{
  "name": "pimlico-tutorial-template",
  "version": "1.0.0",
  "description": "Pimlico Tutorial",
  "main": "index.ts",
  "type": "module",
  "scripts": {
    "start": "tsx index.ts"
  },
  "dependencies": {
    "dotenv": "^16.3.1",
    "ethers": "^6.13.5",
    "permissionless": "^0.2.0",
    "viem": "^2.20.0"
  },
  "devDependencies": {
    "@types/node": "^20.11.10",
    "tsx": "^3.13.0"
  }
}

Step 2: Configuring BuildBear

Note: For this walkthrough, use a sandbox forked from Polygon Mainnet

1. Define the Sandbox URL

const buildbearSandboxUrl = "https://rpc.buildbear.io/{SANDBOX-ID}";

2. Set Up BuildBear Sandbox Network

const BBSandboxNetwork = /*#__PURE__*/ defineChain({
  id: SANDBOX-CHAIN-ID,
  name: "BuildBear x Polygon Mainnet Sandbox",
  nativeCurrency: { name: "BBETH", symbol: "BBETH", decimals: 18 },
  rpcUrls: {
    default: {
      http: [buildbearSandboxUrl],
    },
  },
  blockExplorers: {
    default: {
      name: "BuildBear x Polygon Mainnet Scan",
      url: "https://explorer.buildbear.io/{SANDBOX-ID}",
      apiUrl: "https://api.buildbear.io/{SANDBOX-ID}/api",
    },
  },
});

3. Generate a Private Key

const privateKey = process.env.PRIVATE_KEY || generatePrivateKey();
appendFileSync(".env", `\nPRIVATE_KEY=${privateKey}`);

4. Set Up Public Client

export const publicClient = createPublicClient({
  chain: BBSandboxNetwork,
  transport: http(buildbearSandboxUrl),
});

Step 3: Configuring Pimlico Client & Smart Accounts

1. Set Up Pimlico Client

const pimlicoClient = createPimlicoClient({
  transport: http(buildbearSandboxUrl),
  entryPoint: {
    address: entryPoint07Address,
    version: "0.7",
  },
});

2. Create Smart Account & Client

const signer = privateKeyToAccount(privateKey);
 
const account = await toSafeSmartAccount({
  client: publicClient,
  owners: [signer],
  entryPoint: {
    address: entryPoint07Address,
    version: "0.7",
  },
  version: "1.4.1",
});
 
const smartAccountClient = createSmartAccountClient({
  account,
  chain: BBSandboxNetwork,
  bundlerTransport: http(buildbearSandboxUrl),
  paymaster: pimlicoClient,
  userOperation: {
    estimateFeesPerGas: async () => {
      return (await pimlicoClient.getUserOperationGasPrice()).fast;
    },
  },
});

Step 4: Funding & Executing Transactions

1. Check Account Balance

if (+daiBalanceBefore.toString() <= 0) {
  console.log("⚠️ Fund your Account with DAI tokens from BuildBear Faucet.");
  exit();
}

2. Fund Smart Account

Native Token Faucet

{
  "jsonrpc": "2.0",
  "id": 1,
  "method": "buildbear_nativeFaucet",
  "params": [{
    "address": "0xd8dA6BF26964aF9D7eEd9e03E53415D37aA96045",
    "balance": "10000"
  }]
}

ERC Token Faucet

{
  "jsonrpc": "2.0",
  "id": 1,
  "method": "buildbear_ERC20Faucet",
  "params": [{
    "address": "0xd8dA6BF26964aF9D7eEd9e03E53415D37aA96045",
    "token": "0x8f3Cf7ad23Cd3CaDbD9735AFf958023239c6A063",
    "balance": "10000"
  }]
}

3. Setup Helper Functions

async function getUSDTBalance(): Promise<string> {
  let res = await publicClient.readContract({
    address: "0xc2132D05D31c914a87C6611C10748AEb04B58e8F",
    abi: ERC20Abi,
    functionName: "balanceOf",
    args: [account.address],
  });
  return formatUnits(res as bigint, 6).toString();
}
 
async function getDAIBalance(): Promise<string> {
  let res = await publicClient.readContract({
    address: "0x8f3Cf7ad23Cd3CaDbD9735AFf958023239c6A063",
    abi: ERC20Abi,
    functionName: "balanceOf",
    args: [account.address],
  });
  return formatUnits(res as bigint, 18).toString();
}

4. Initialize Swap Params & Estimate Cost

let swapParams = {
  tokenIn: "0x8f3Cf7ad23Cd3CaDbD9735AFf958023239c6A063",
  tokenOut: "0xc2132D05D31c914a87C6611C10748AEb04B58e8F",
  fee: 3000,
  recipient: account.address,
  deadline: BigInt(Math.floor(Date.now() / 1000) + 120),
  amountIn: parseEther("1"),
  amountOutMinimum: BigInt(0),
  sqrtPriceLimitX96: BigInt(0),
  v3Router: "0xE592427A0AEce92De3Edee1F18E0157C05861564",
  paymasterV7Address: "0x0000000000000039cd5e8ae05257ce51c473ddd1",
};
 
console.log("🟠 Calculating UserOp Cost in DAI....");
 
const quotes = await pimlicoClient.getTokenQuotes({
  chain: BBSandboxNetwork,
  tokens: [swapParams.tokenIn],
});
 
const { postOpGas, exchangeRate, paymaster } = quotes[0];
 
const userOperation = await smartAccountClient.prepareUserOperation({
  calls: [
    {
      to: swapParams.tokenIn,
      abi: parseAbi(["function approve(address,uint)"]),
      functionName: "approve",
      args: [swapParams.v3Router, parseEther("1")],
    },
    {
      to: swapParams.v3Router,
      abi: parseAbi([
        `function exactInputSingle(
        (   address, 
            address, 
            uint24, 
            address, 
            uint256,
            uint256, 
            uint256, 
            uint160)
            ) 
         external payable returns (uint256 amountOut)`,
      ]),
      functionName: "exactInputSingle",
      args: [[
        swapParams.tokenIn,
        swapParams.tokenOut,
        swapParams.fee,
        swapParams.recipient,
        swapParams.deadline,
        swapParams.amountIn,
        swapParams.amountOutMinimum,
        swapParams.sqrtPriceLimitX96,
      ]],
    },
  ],
});
 
const userOperationMaxGas =
  userOperation.preVerificationGas +
  userOperation.callGasLimit +
  userOperation.verificationGasLimit +
  (userOperation.paymasterPostOpGasLimit || 0n) +
  (userOperation.paymasterVerificationGasLimit || 0n);
 
const userOperationMaxCost = userOperationMaxGas * userOperation.maxFeePerGas;
 
const maxCostInToken =
  ((userOperationMaxCost + postOpGas * userOperation.maxFeePerGas) * exchangeRate) /
  BigInt(1e18);

4. Send Transaction

const txHash = await smartAccountClient.sendUserOperation({
  account,
  calls: [
    {
      to: swapParams.tokenIn,
      abi: parseAbi(["function approve(address,uint)"]),
      functionName: "approve",
      args: [swapParams.paymasterV7Address, maxCostInToken],
    },
    {
      to: swapParams.tokenIn,
      abi: parseAbi(["function approve(address,uint)"]),
      functionName: "approve",
      args: [swapParams.v3Router, parseEther("1")],
    },
    {
      to: swapParams.v3Router,
      abi: parseAbi([
        `function exactInputSingle(
        (   address, 
            address, 
            uint24, 
            address, 
            uint256,
            uint256, 
            uint256, 
            uint160)
            ) 
         external payable returns (uint256 amountOut)`,
      ]),
      functionName: "exactInputSingle",
      args: [[
        swapParams.tokenIn,
        swapParams.tokenOut,
        swapParams.fee,
        swapParams.recipient,
        swapParams.deadline,
        swapParams.amountIn,
        swapParams.amountOutMinimum,
        swapParams.sqrtPriceLimitX96,
      ]],
    },
  ],
  paymasterContext: {
    token: swapParams.tokenIn,
  },
});
 
console.log("🟠 Swapping DAI....");
 
let { receipt } = await smartAccountClient.waitForUserOperationReceipt({
  hash: txHash,
  retryCount: 7,
  pollingInterval: 2000,
});
 
console.log(`🟢User operation included: 
https://explorer.dev.buildbear.io/{SANDBOX-ID}/tx/${receipt.transactionHash}`);

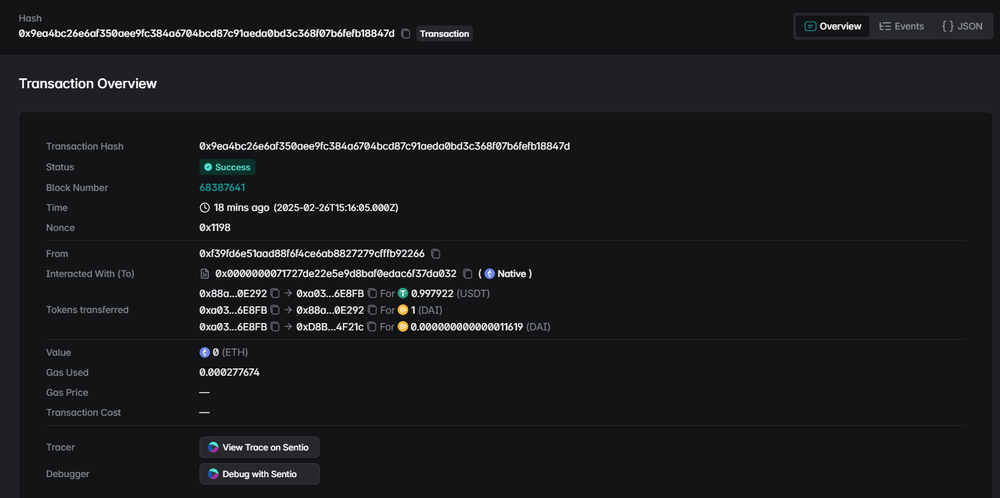
Execute the script with npm start and the swap should go through producing the following output:

====================================
Smart Account Address: 0xa03Af1e5A78F70d8c7aCDb0ddaa2731E4A56E8FB
====================================
-------- UserOp to Swap DAI to USDT on Uniswap V3 with Alto ---------
🟠 Balance before transaction:  100.99956781271324068
🟠 DAI Balance before transaction:  85.99999999999986006
🟠 USDT Balance before transaction:  14.970922
====================================
🟠 Approving DAI....
====================================
🟠 Calculating UserOp Cost in DAI....
====================================
🟠 Swapping DAI....
🟢 Yay!! 🎉🎉 Swapped 1 DAI to 0.9979220000000009 USDT
🟢 Balance after transaction:  100.99956781271324068
🟢 DAI Balance after transaction:  84.999999999999848441
🟢 USDT Balance after transaction:  15.968844
🟢 Max DAI Estimate for UserOp:  1.056731379494445588
🟢 DAI charged for UserOp:  0.000000000000014211

Execution Output Screenshot


Step 5: Debugging and Deep Dive into UserOp with Sentio

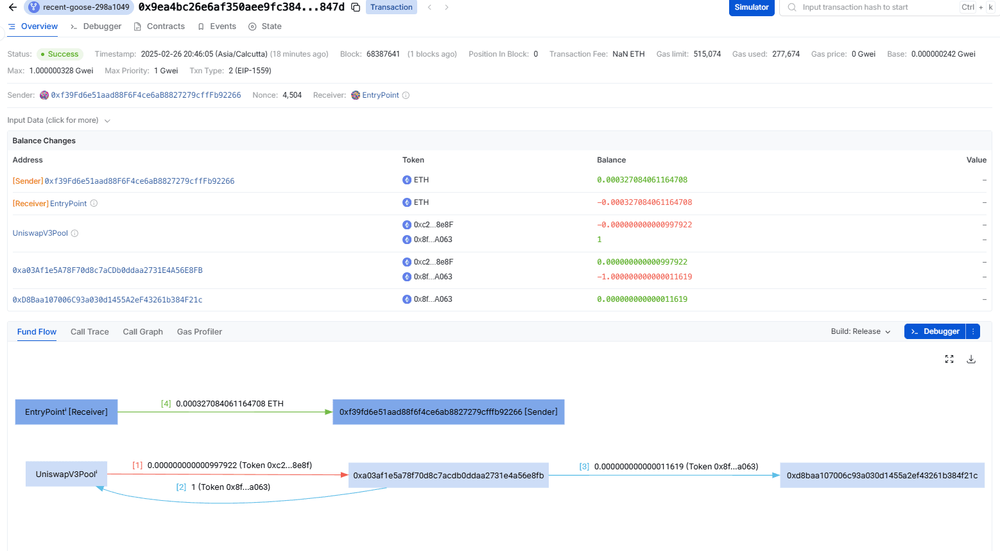
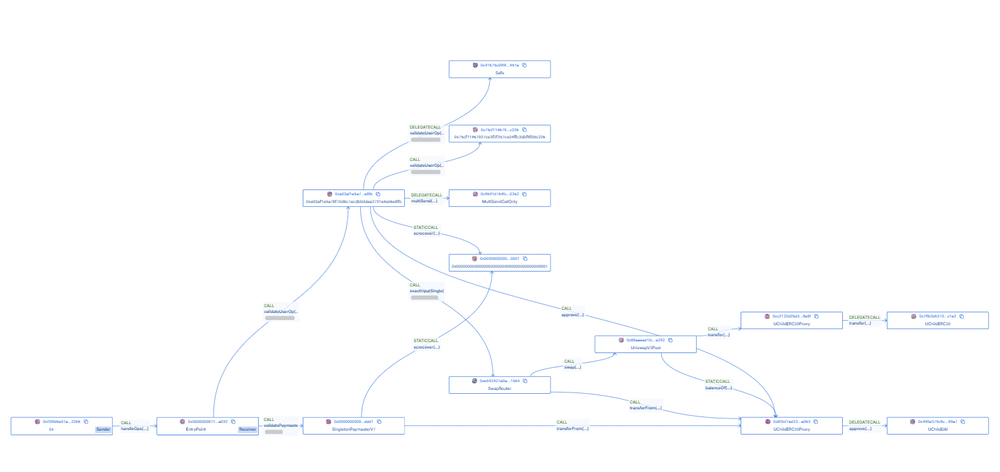
Clicking on View On Sentio will open a Sentio debugger for the transaction, where you can observe:

1. Fund Flow

  • Depicts the flow of funds among different contracts and their order of execution
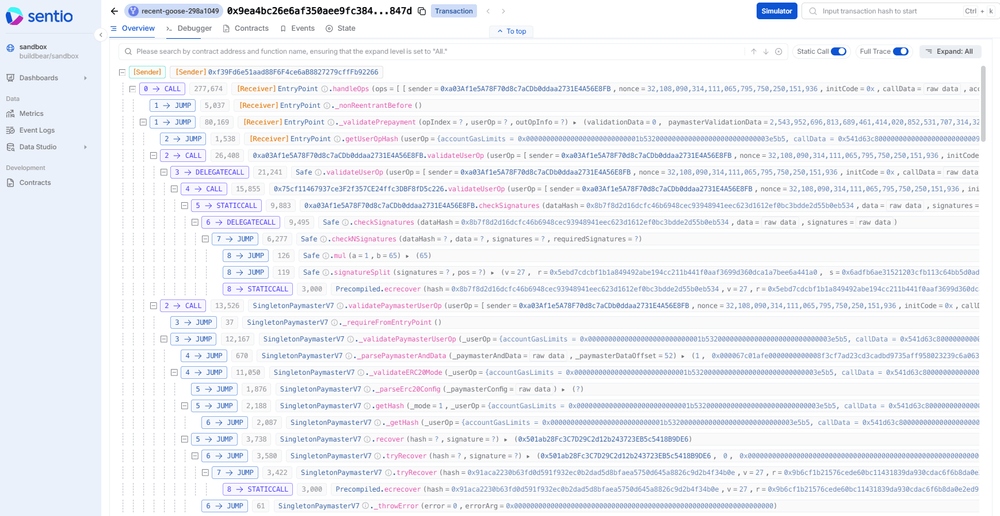
Fund Flow

2. Call Trace

  • Shows the entire call trace for the transaction, including:
    • Contract calls
    • Functions called within the contract
    • Inputs and outputs

Call Trace

3. Call Graph

  • Visual graph showing top-level overview of contract interactions
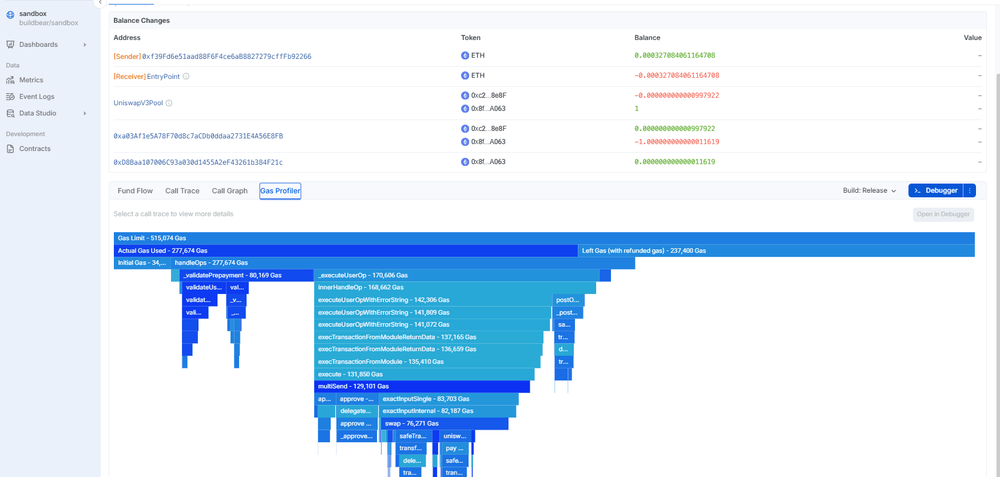
Call Graph

4. Gas Profiler

  • Displays gas usage per function and gas metrics:
    • Limits, actual usage, initial gas

Gas Profiler

5. Debugging With Sentio

  • Access the Debugger Tab:
    • View inputs, gas metrics & return values for every call
  • Contracts Tab:
    • Deeper inspection of smart contracts and functions
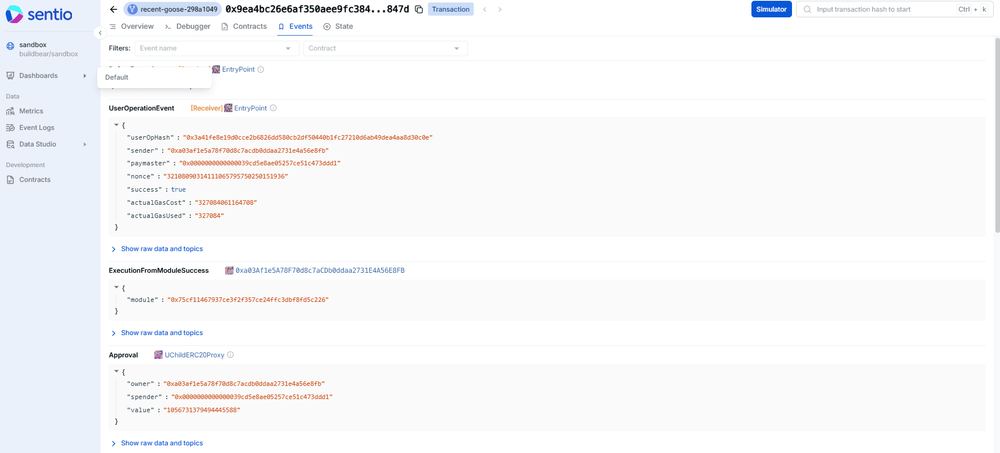
  • Events Tab:
    • All event emissions from the transaction
  • State Tab:
    • State of funds before & after the transaction

Debugger Tab Contracts Tab Events Tab

✅ Conclusion

By following this tutorial, you have successfully:

  • ✅ Set up Pimlico on BuildBear
  • ✅ Configured a smart account using permissionless.js
  • ✅ Set up ERC20 Paymaster with Pimlico Client & Alto Bundler
  • ✅ Funded the smart account using BuildBear faucets
  • ✅ Executed a UserOperation to swap tokens on Uniswap V3 using ERC20 gas payments (DAI)

For full code and demos, check out the GitHub repository!